Thursday, December 19, 2013

vCAC Windows Deployment Stuck at CustomizeOS State

I ran into this issue in my lab recently.  I configured my Windows VM template with the vCAC guest agent (gugent) and then created a blueprint that used the agent to run a script on the deployed machine. 

The machine state would stop every time on "CustomizeOS" and eventually the deployment would time out.  From the Windows machine, I looked at the guest agent log and saw that it would hang every time on Wait for completion of '10_customizeos.bat' with no other progress.


The problem was that the scripts for the guest agent (located in the c:\VRMGuestAgent\site folder) were all "blocked" and could not be executed.  For example, looking at the properties of c:\VRMGuestAgent\site\CustomizeOS\10_customizeos.bat showed that ""This file came from another computer and might be blocked to help protect this computer" - with the option to "Unblock"...


I noticed that the GugentZip_x64 that I downloaded from the vCAC 6.0 appliance was also blocked - this means that the content of the zip would also be blocked when unzipped!

To fix this (or prevent it), simply unblock the zip before extracting.  In my case, I took the extra precaution of removing the vCAC gugent service, deleting the entire c:\VRMGuestAgent and doing a fresh install with my "unblocked" zip.

Sunday, December 15, 2013

Installing the Application Director 6.0 Bootstrap Agent on a Windows VM Template

In order to use a vCAC vSphere template with Application Director, you must install the Application Director agent on your VM. In this example, I have created a VM with Windows 2008 R2 that already has the vCAC guest agent installed. I will show how to add the Application Director agent and then prepare this for use with a linked clone vCAC vSphere blueprint, which can then be used for an Application Director OS template.

Friday, December 13, 2013

How to Modify or Disable Session Time Out for vCAC 6.0

The session time for the vCAC 6.0 console is set time timeout after 30 minutes.   Depending on your security needs, it may be helpful to decrease, increase or disable the session timeout.

You will need to modify a file on the vCAC 6.0 virtual appliance - DO THIS AT YOUR OWN RISK and please snapshot the VM or back up the file (or both, even better).  This is not an official VMware supported modification. 

The file you will need to edit:

/usr/lib/vcac/server/webapps/shell-ui-app/WEB-INF/web.xml

The section you will need to edit:

As you can see, the default value is in the session-timeout section and set at 30 minutes.  If you wish to disable the timeout altogether, just use -1 for the value there.

Restart your vCAC appliance to effect the change.

Wednesday, December 11, 2013

Hyperic 5.8 Released - vApp Upgrade Instructions

VMware released a minor upgrade for Hyperic yesterday - release notes are here.

Starting with the 5.0 release, VMware made a vApp version of Hyperic available.  If you have deployed a previous version of the Hyperic and want to upgrade I have already documented the steps in a previous post - see here - but you will need the 5.8 package of course.

Be sure to grab the hyperic-hqee-installer-x86-64-linux-5.8.0.tar.gz from VMware downloads - the screen cap below shows the exact listing in the file downloads area that you will need.


There's another file for Linux, the RPM, that won't work.

The complete upgrade process from the VAMI looks like this...


Monday, August 19, 2013

Use a Clean Blueprint When Importing Existing Infra into vCAC

A customer ran into this recently and suggested I post it on my blog.  He even let me use his screen shots! (Thanks Joseph).

The problem was that after importing some existing VMs it was noted that the Action Items available were limited to just a few selections.


Upon examining the screen shot, you may notice (if you look REALLY hard and use your imagination - sorry about the quality of the screen shot) that the machine's state is "Machine Provisioned" and there are only 3 actions available (Edit, Destroy, Expiration Reminder).

You may notice that the STATE of the machine dictates the available items in the Actions menu - obviously you can't RDP to a powered off server, for example.  Thus, the limited action items were correct, but what was not good was the hung "Machine Provisioned" state for an imported VM.

What had happened here is that the blueprint had a custom workflow stub set up for provisioning and since the existing VM didn't have the guest agent installed, so the workflow just waited.

To avoid any problems like this when importing unmanaged VMs into vCAC, VMware recommends creating a new, clean, simple blueprint - you can always customize the blueprint later if needed with lease times, archive times, workflow customizations (think about adding a disposing custom workflow to simplify decommissioning these existing VMs later).  But for the initial import, keep it clean!

Also, be aware of any custom properties which kick off provisioning workflows associated with build profiles, reservations, provisioning groups, etc as these can also impact your import.

Setting up LDAP with vFabric Application Director and a 2008 AD Domain Controller

Hopefully this will save you some time in setting up - the documentation provides pretty good overview of how to do this, but some details are left out.  This guide should get you up and running for a basic configuration.

First, you will need to run the darwin-cli either remotely or from the AppD appliance.  I decided to run it from my Windows 7 PC for convenience (you will need JRE 1.6 installed, although it did run fine on my PC with JRE 1.7).

I copied the /home/darwin/tools/darwin-cli.jar on the AppD appliance using WinSCP  and using the darwin_user credentials.

To run the client, simply open a command prompt, navigate to the directory where you copied the file and run java -jar darwin-cli.jar and you should be presented with the "roo" interface as in the screen shot below -


Now you can connect to your AppD instance by issuing the following command at the "roo" prompt:

login --serverUrl https://ip-or-fqdn-of-appd-appliance:8443/darwin --username admin
And you will be prompted for the admin password.

Once logged in you can now create an LDAP config.  I used the following command:

create-ldap-config
Then I answered the prompts as follows:

Server Attributes
Use SSL to communicate to LDAP server (ldaps)? [y/N]: n
* Server name/IP: 192.168.1.200
* Server port: 3268 (note, use port 3269 for SSL LDAP)
* Server base DN (eg: dc=example,dc=com): dc=mylab,dc=dias
Does your LDAP server support anonymous query? [Y/n]: n
* Username to use when querying for users: administrator@mylab
* Password to use when querying for users: ********
        Please re-enter the value: ********

User Attributes
  Base DN of user sub-tree (blank to search from root):
* Username attribute: sAMAccountName
* User UID attribute: objectGUID
* User's group membership attribute: memberOf
  User's first name attribute:
  User's last name/surname attribute:
  User's email address attribute:

Group Attributes
  Base DN of group sub-tree (blank to search from root):
* Group name attribute: cn
* Group UID attribute: objectGUID
* Group's member list attribute: member

LDAP Configuration Name
* Enter the name for this LDAP configuration:
A value is required, please try again.
* Enter the name for this LDAP configuration: mylab-ldap
NOTE that I used 3268 for the "Server port" - if you use the default of 389 the test will work, but you will not be able to login using those AD accounts.  As noted, 3269 can be used for an SSL LDAP connection (Thanks, Chris Lennon).

Also note that I did not use SSL for this configuration.  If you want/need to use a secure connection for LDAP, you will need to install the AD server certificate in the keystore on the AppDirector server.  Instructions can be found in the Application Director 5.2 documentation here.

BEFORE you make this active, you should test it as follows:

test-named-ldap-config --configname mylab-ldap --name gfreeman

Of course, replace "mylab-ldap" and "gfreeman" with the name of the configuration you just created and a valid AD login ID.  If all is good, you should see output similar to this:


Now you can activate your LDAP config as follows (THIS IS NOT REQUIRED if you are running AppD 6.0 and have created only one LDAP config):

activate-ldap-config --configname mylab-ldap
 Again, replacing "mylab-ldap" with your configuration name.

Now you are ready to add AD users and groups to your AppD instance.  I won't go into the roles and groups here, that is pretty well documented in the product guide I linked above.  However, here's an example of adding an AD group "Domain Admins" to the "Default" group so that I can log in with my AD user name instead of the local "admin" account (I'm going to assign all roles to the group):

import-ldap-group --name "Domain Admins" --group Default --roles ROLE_CATALOG_ADMIN,ROLE_DEPLOYER,ROLE_SYSTEM_INTEGRATOR,ROLE_APP_ARCHITECT,ROLE_CLOUD_ADMIN --configname mylab-ldap
Again, use your configuration name in place of "mylab-ldap" as before.

Monday, July 29, 2013

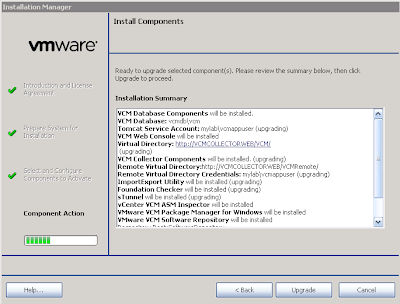
Upgrading vCenter Configuration Manager from version 5.6 to 5.7

VMware released an update to vCenter Configuration Manager this month and I thought I would document my experience upgrading my lab instance.  The upgrade steps are clearly documented in the Advanced Install Guide starting on page 129 (as of this posting).  In my lab is a two-tier install as follows:

  VCMDB -
  • Windows 2008 R2 SP1 OS running MS SQL 2008 R2
  • Houses the vCM database services
  VCMCOLLECTORWEB

  • Windows 2008 R2 SP1 OS running MS SQL 2008 R2 and SSRS 2008 R2 
  • IIS 7
  • Houses the vCM collector and web services
One thing to note is that as of vCM 5.7 there is no requirement for vCM components to be installed on the DB server.  So, the first thing we will do for this two-tier upgrade is uninstall vCM from the DB server.

Loading the 5.7 installer on VCMDB, I will (1) click the radio button for the "Remove" operation (the documentation states "Uninstall" but there's no such option).  (2) Click "Next"...


Note the very stern warning on the next screen, promptly ignore it and (3) click "Uninstall" - do not worry, this doesn't remove the vCM database.


Uninstall proceeds... packages being removed... reticulating splines...


When the uninstall is finished, click "Finish" (do you really need a screen shot for this?).

You're done with the DB server, now I'll run the 5.7 installer on VCMCOLLECTORWEB.

This time, I will (1) select "Upgrade" and then (2) "Next"


You'll be able to "Next... Next... Next..." through most of this so I won't bother with things like the patent info screen or license acceptance.  You will note that the installer picks up all the components already installed as targets for upgrade, nothing to do here just FYI.


"Gathering System Information" can take a bit - took about 5 minutes on my lab instance.  But, all you need to see is "Checks were successful!" and then you can proceed.


On the next screen, the DB information should be pre-filled, I will go ahead and (3) click "Validate" to make certain everything is still in order - I get the message "Database validation successful." so I know I'm good-to-go!


You will continue to notice much of the information pre-filled, so just "Validate" as needed and click "Next" through the rest of the screens... I did get a nasty little note during the WebService validation which I believe was due to my using HTTP instead of HTTPS for this - I promptly dismissed it to no ill effect.


Likewise, I noted the User Rights message during the Collector Service Account setup page and dismissed it and continued on.


After about a dozen mouse clicks on the "Next" button you are then presented with the option to "Upgrade" which I happily clicked.


This part took about 25 minutes to complete in my lab.  Easy peasy!

Saturday, July 27, 2013

vCD vApp Deployment Fails for vCAC Blueprints on Windows Administrator password setting

I ran across this while building a lab for a customer this week and hopefully this will save you a little time.  When I built the vApps in vCloud Director 5.1.2 I selected the "Reset Password" option in the VM Properties as shown below....


However, this setting in a vApp template causes the vCAC vApp deployment workflow to fail with the following error:

Error in workflow cleanup. [Workflow Instance Id=somenumber] Error customizing vApp. Inner Exception: The administrator password cannot be empty when it is enabled and automatic password generation is not selected.

This is a 'feature' of the vCD 5.1.2 API and not a problem with vCAC.  It seems that passing the administrator password through the API was removed as of that release.  I understand that this is likely to be changed back in a future release - and I'll try to remember to update this post if/when that happens.

For now, you will need to disable the password reset within the VM properties for any template you wish to deploy from a vCAC vApp blueprint.

Wednesday, July 24, 2013

vCAC 5.2 Upgrade Gotcha - "Models table exists..."

The vCAC 5.2 upgrade process is pretty well document, but if you aren't paying attention (and I never pay attention) you could end up with an error show below:


"Error: Model Manager Data has been previously deployed.  Models table exists under the database DCAC"

You have probably completely uninstalled the previous vCAC instance.  Not what you want to do - you will uninstall practically everything else, DEMs, Agents, extensibility features, etc.  But, the upgrade still requires the existing core product to be in place.

Hope this saves some time for folks.  Hat tip to Eric H. for providing the screen shot.

Tuesday, July 23, 2013

Understanding and Validating vC Ops Sizing Recommendations

I got the same (well, similar) question today from two different customers so I thought a post explaining the vC Ops sizing recommendation views and reports was in order.  You may be familiar with the Oversized VM and Undersized VM reports available in vC Ops.  I typically caution that these are RECOMMENDATIONS and some additional research should be done before making a final call on resizing.

Let's look at an example from my lab.  I have a SQL database server which is showing up as undersized in vC Ops.


Note that the "% CPU Undersized" is slight (less than 3%) and there is no undersized concern for memory.

Now, a frequent misunderstanding is that the Workload score for a VM can be used to verify the sizing recommendation - this is not the case.  The capacity analysis is an average of the CPU and memory utilization over the time period specified in your configuration, by default daily average over 30 days (you can change this by going into "Configuration > Manage Display Settings > Edit > Non-Trend Views and adjusting "Interval to use:" and "Number of intervals to use:" settings).

On the other hand, the Workload badge reflects the current state of resource utilization.  For example my vCMDB server shows that memory is the most utilized resource when looking at Operations > Details > Workload Badge.  Memory is at 15% workload and also shows as the "BOUND BY" resource area. 

Note that vC Ops will display the BOUND BY for the highest scoring workload resource - it is a good indicator of a bottleneck if the workload is high, but in this case it is nothing to be concerned about.  Note also that the Dynamic Threshold for CPU (highlighted in yellow) is a pretty wide threshold.  This usually indicates a "peaky" behavior for that resource and thus a hint that while CPU is pretty docile at the current time, it's been known to spike.

So, it is important to understand this key difference - Health/Workload/Anomalies/Faults are all real-time indicators (well, nearly real-time - actually 5 minute granularity).  The capacity reports are AVERAGES over a given time period (by default 30 days).

Given that, how can I validate the sizing recommendations?

This is where the Operations > All Metrics feature comes into play.  From here, I can chart any metric collected from vCenter about any of the objects in a given time series.  For my purposes, I will chart the vCMDB server's CPU Demand and Memory Demand metrics over the past 30 days.


First, notice that there is a blue line indicating the metric five minute samples and a grey area behind the blue line.  The grey area is the Dynamic Threshold and I have displayed it for the entire 30 day period by selecting the option indicated by the red arrow in the image.  The blue arrow indicates the default of displaying only the 24 hour Dynamic Threshold.

Now as you look at this, you should notice that overall CPU (the top graph) demand regularly and predictably hits a CPU demand of 103% - that correlates very nicely with the information from the sizing recommendation.  Recall that we were undersized by about 2%-3% in that report.

Another thing to note is that memory usage is pretty consistent at somewhere between 1.5GB and 2GB (with a noteable exception around July 15th where a server reboot caused an anomaly).  Thus, the recommendation that memory is not undersized is spot on as well.

Finally, the Dynamic Threshold for memory makes a really nice granular shadow behind the blue line - our vC Ops analytics have pretty well nailed "normal" behavior for memory and that's a good thing.  On the other hand, CPU seems to have recalculated somewhere around July 18th - why would this happen?  Well, if you look closely at the graph, you may notice that the lower end of CPU utilization dropped after the server reboot on July 15th.  After about three days of this consistent "new" normal behavior, the analytic engine in vC Ops decided it was time to calculate this new normal and reset the Dynamic Threshold for this metric to a broader "high/low" while the detailed granularity is being figured out.

A couple of final thoughts:

  - Always validate the recommendations against the metric graphs, and I recommend using the "Demand" based metrics since they show what a VM would LIKE to use versus what it is actually USING.  Very important difference!
  - Consider your SLA, for example, even though I'm undersized during the peak workload that may not be impacting the ability to deliver the required service (think about a report that runs after hours, or a DB update - if I can still do it within the SLA window, why add resources?)


Monday, June 17, 2013

Monitor a Windows Service with Hyperic and vC Ops

A question appeared this morning on the vC Ops VMware Community forum that I thought would be a helpful blog post.

"Is it possible to monitor the services on the VM's?"

The answer is "yes" and this is done through the wonderful integration of Hyperic and vC Ops.  Another response to this question is "yes, with vCM" and while that is true, it is a slightly different use case.  I will explain quickly.

  - With Hyperic monitoring the service, you can not only get real time availability of the service (i.e. is it up or down?) but also get monitoring on performance and apply the vC Ops analytics to those service metrics.
  - With vCM you can validate if a service is in a particular state (running, not running, manual, automatic, disabled, etc) to enforce your server best practices, security and compliance.  This is not a real time status of the service but rather a configuration check of the service at an interval you specify.

I will assume the question is for the Hyperic use case and explain how to configure monitoring for a Windows service - I'll post the same for Linux, provided I get requests, but once you understand the Windows settings you should be able to figure the Linux side out for yourself.

I also assume that you have Hyperic running, you have integrated it with vC Ops and that you have one or more Windows systems monitored by Hyperic.  See my blog post "vC Ops and Hyperic - Dynamic Duo of Enterprise Management" if you need help getting started.

First, from the platform browser of you Windows server, select Tools > New Platform Service as below.  I am using my vCAC server running Windows 2008R2 in this example.


In the New Service setup, define a name, description (optional) and select the Windows Service from the Service Type pull down menu.  Note the other service types - I highly recommend you explore those as well.  Click OK to continue.


After clicking OK in the service setup above you will be presented with the properties page for the new service.  Click the "Configuration Properties" hyperlink.


You will need the service name here.  To get that, open the properties for the service on your Windows system and record the service name.


Then use that service name in the configuration properties and click OK.


In about 5 minutes, you will have the metric data displayed for the default metrics as indicated in the screen cap below.  If you expose all metrics by clicking "Show All Metrics" you can enable collection for the other metrics available.  


 A full list is provided in the vFabric Hyperic Resource Configuration and Metrics Guide but I have included the table below for your reference.

Now, if you have vC Ops configured with the Hyperic adapter, then those metrics will now appear in the Custom UI and can be added to your dashboards.

Wednesday, June 12, 2013

Hyperic 5.7 Released - vApp Upgrade Overview

Hyperic 5.7 went GA this week and while upgrading the vApp is pretty easy, there's some info not included in the documentation that can help you get through this quickly.

First, the vApp upgrade steps in the "Getting Started with vFabric Hyperic 5.7 Guide" don't tell you which file (of the dozen or so available on the VMware download site) to use.  You want to grab the file hyperic-hqee-installer-x86-64-linux-5.7.0.tar.gz for this upgrade.

You will need to place the file on an FTP or Web server you can access from the Hyperic vApp.  You will be using the VAMI interface at https://:5480 to perform this upgrade.  In my case, I just put it on my lab FTP server and enabled anonymous login so the wget process run by the VAMI upgrade can download the file.

Here's a screen shot of the install - be sure to get a snapshot of your Hyperic VMs before starting the upgrade!  These screens show you all you need to know....

Starting the upgrade....

...upgrade finished!!

You may want to upgrade your agents - there are some fixes for a couple of the plugins, most notably Windows AD 2008 monitoring is finally working!  Thankfully, this is a pretty pain free process as well.  What I recommend is to create a group for all of the HQ Agent "servers" so you can upgrade at one time.

To do this, you select "New Group" from the Tools menu under the Browse tab - as below.

NOTICE - my "Group Type" is "HQ Agent"....


Now I can select that group, and click the "ADD TO LIST" under the Resources table....

Just select all of your servers...


...and move them over to the right hand "Add Resources" table and click "OK"


Now you are ready to upgrade the whole group, by selecting "Views" and then "Agent Commands" for the group.  The agent operation you want is, of course, "upgrade"


And that's it - after a while (my lab only took a few minutes for the half-dozen servers) you can verify the agent version by browsing to the server and selecting it.


Monday, June 10, 2013

vC Ops - How to Edit Your Balanced Metrics Profile

NOTE - adding metrics to the balanced profile can impact the sizing and performance of your vC Ops vApp.  Be very conservative with the metrics you add and only add them as required.  As always, I highly recommend you consult VMware support directly before making any changes to your vC Ops vApp.

Beginning with version 5.7, you can choose to have the vApp collect a subset of the vCenter metrics with vC Ops.  This is about a 50% reduction in the amount of metrics collected and has a few benefits.

 - the vApp will support approximately 12,000 VMs with this profile
 - Analytics calculation will use less CPU and memory
 - overall reduction in resources required for the vApp

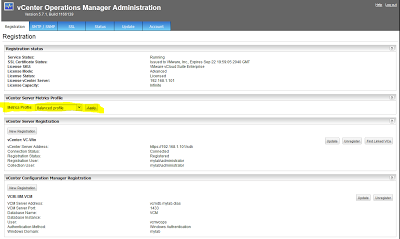
You must enable this, as it is not turned on by default, through the Admin UI.  Screen shot below shows how.  **UPDATE** as of version 5.8 the "Balanced Profile" is the default setting.


For those using this, I did uncover a tiny little issue while talking to a customer today.  At least one of the heat maps in the vSphere UI relies on a metric that is not collected with the balanced profile applied.  The result is a heat map that looks something like this:


So, in this case, the metric we need to add is "Network:Aggregate of all Instances | Dropped Packets" to get the heat map coloration working.

It is possible to add metrics to the balanced profile, but it requires access to the Custom UI.  So, you need to be running Advanced or Enterprise for this capability.

Log into the Custom UI, go to Environment > Configuration > Attribute Packages.


  From there, pull down the VMware adapter kind and then the resource kind for which you need to add the metric.  In our case, this is Host System. You will see two Attribute Packages - Default Attributes and All Attributes.


  Default Attributes = Balanced Profile
  All Attributes = Full Profile

Just a note, that when you select Balanced Profile in the Admin UI, vC Ops is changing the default attribute package to Default Attributes for all VMware resources - otherwise, you'd have to do this manually and that would suck! :)

Now, edit the Default Attributes (just select it and click the pencil icon).   Again, we need to add a specific metric to get our heat map in working order, so browsing to the network group I will select Dropped Packets.  As you can see in the screen cap below it is not on by default with the balanced profile (aka Default Attributes).


Click the OK button to save.  That's it!

Monday, June 3, 2013

The Truth

I try to stay away from marketing type stuff on my blog - I'm basically here to help and share what I've learned.  But these videos are a lot of fun - enjoy!

http://vimeo.com/channels/polygraphtest

PS - my favorite part is when the MS guy freaks out at the mention of "Tuesday" - classic!

Wednesday, April 24, 2013

vC Ops 5.7 Update - VCM Integration Fix

If you use the VCM/vC Ops integration, the 5.7 update may have caused a little problem for you.  As you may know, vC Ops 5.7 introduced the "balanced profile" for limited metric collection and scale - basically, this setting (in the Admin UI) tells vC Ops to collect a subset of metrics from vCenter, which in turn not only allows you to scale to more VMs (12,000 from the norm of 6,000), you may also see better performance for the analytics and possibly even more accuracy for the major badges.

Anyway, turning on the "balanced profile" with VCM integration causes your Compliance badge and results to go "grey" - this was quickly addressed by the product team and the fix can be found at this link...

https://my.vmware.com/group/vmware/get-download?downloadGroup=VCOPS-PATCH-57

...it also fixes another issue related to time remaining chart not showing on the dashboard.  I personally didn't run into this problem, but did see the VCM issue.

Friday, March 8, 2013

Updating the AV Dashboard in vCM

Out of the box, vCM has the ability to detect if a managed system is running anti-virus software.  The "Windows Anti-Virus Analysis Dashboard" looks for services installed from a list of products from CA, McAfee, Symantec and Trend Micro.

I recently got involved with a customer who was frustrated that his versions of Trend Micro (10.5 and 10.6) wasn't being detected.

As it turns out, this dashboard is based on a view in the VCM SQL database - 

ecm_view_rpt_antivirus_vendors

Looking at the view, there are a set of select statements, for example:

SELECT
  'Trend' AS vendor,
  'Trend Micro OfficeScan' AS service_product_name,
  'OfficeScanNT RealTime Scan' AS service_display_name,
  'ntrtscan' AS service_internal_name,
  'ecm_fn_rpt_antivirus_trend_scanengine_s' AS scanengine_fn,
  'ecm_fn_rpt_antivirus_trend_pattern_s' AS pattern_fn
UNION

The "service_display_name" and the "service_internal_name" should match the Windows service information (check services.msc).  In the case of my customer, the service_display_name for HIS version of Trend Micro OfficeScan was slightly different, "OfficeScan NT RealTime Scan" and making this modification to the view fixed his problem.

You can also use this view to add AV solutions.  Be sure to make a backup of the view script before you modify so you can revert back.

This is not supported, use at your own risk, I'm not responsible if you hose your vCM DB, etc. :)

(Thanks to my VMware EM peers for the help with this.)

Monday, March 4, 2013

VCM Server Registration for vC Ops vApp 5.6

You may notice that the vC Ops Admin UI (aka the VAMI) includes a registration option for VCM in 5.6.  This enables some really great integration between vC Ops and VCM, chiefly, compliance badge (part of the Risk badge family) and exposure of VCM machine groups for custom grouping.

For whatever reason, getting this set up is slightly challenging and to save time and frustration I thought I'd provide a couple of helpful tips.

 - Always use Windows Auth
 - Never specify the domain as part of the user credentials
 - Never specify the FQDN of the Windows domain
 - For a split install (2 or 3 tier) be sure to point at the VCM database server

As in the screen cap below....

Thursday, February 21, 2013

vC Ops 5.6 Custom Groups - Using Wildcards

A question popped up in the vCenter Operations Manager community about using wildcards for custom group membership search criteria.  It seems that * is not a valid wildcard.  So, I guessed that since the query is performed against the PostgreSQL database in vC Ops then it's likely that PG wildcards could be used - I guessed correctly!  And that rarely happens....

This means, if you are defining membership using a search criteria on resource name, for example, you can select the "contains" operation and use the % and _ (that's percent sign and underscore characters) to broaden your criteria.

For example, I have the following VMs in my environment:

BM-SLES11.1-001
BM-W2K3-001
BM-W2K3-002
BM-W2K3-107

If I wanted only the VMs with 'BM-W2K3' in the name I would put 'BM-W2K3%' in the criteria properties.  See below.


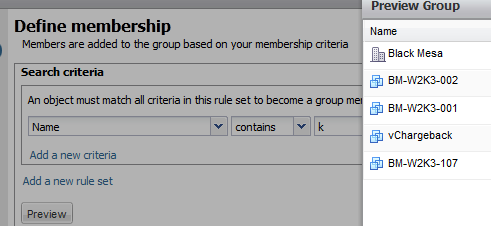
Keep in mind, I don't have to put any wildcard characters.  It looks like the % wildcard is added on either side of the property if you don't put it.  So, doing something like just 'k' would return resources with 'k' anywhere in the name.  Like this...

 
Which would be the same as '%k%' right?  So, what else can we do?  The '_' character can be used to specify a wildcard of just one character, and I can stack these to get the results I need.  For example, I want all servers which start with 'BM-' and have exactly 8 characters in the middle followed by a '-' and then any number of additional characters (I am using 'BM-________-%' which has 8 underscore characters in the middle)...


This provides a lot of flexibility in setting up search criteria for custom group membership!

Friday, January 25, 2013

vC Ops - Why Won't My License Apply?

Just a little heads up on frustration that you may encounter with vC Ops 5.6, which is documented in KB 2040718.  Here's how it usually plays out...

The vSphere admin decides to upgrade to or install vC Ops 5.6 and hasn't yet upgraded vCenter to 5.1.  The default license provided is for vCenter 5.1 installs and the product entitlement is downgraded to Foundation because the license is not recognized.

Reading the KB above the admin is able to obtain and apply the correct key.  However, they see that vC Ops is STILL not licensed at the appropriate level.

Here's a pro-tip - vC Ops vApp updates license entitlement from vCenter once an hour.  To immediately apply new license entitlement, run the following from the UI VM...

vcops-admin license update

...and you're good to go without needing to restart the vApp.